I'm currently working on a GIS Web application to learn about working with spatial data. This post describes the first step of this project - getting a map on a webpage that utilizes geolocation when initialized. I'm using GeoDjango as a framework (though for this part of the project, it's not really necessary), and the map data comes from OpenStreetMap. I'll also be using the Leaflet API (via Django-Leaflet) to embed the map in my app and make it interactive and Mapbox tiles to make it pretty(-er).
Setting up the GeoDjango Project
Although I won't go into detail on setting up a GeoDjango project, (there's an official tutorial that will get you there better than I could), there are a couple of things to mention.
Creating a Spatial Database
I use Mac OS and Postgres.app, which comes with PostGIS preinstalled \o/. If you do too, one thing to note is you won't need to use a spatial database template to create your database.
Just create your database as you would any other:
~$ createdb lostandhound
open that database with psql:
~$ psql lostandhound
psql (9.4.1)
Type "help" for help.

lostandhound=#
and enable spatial functionality:
lostandhound=# CREATE EXTENSION postgis;
CREATE EXTENSION
lostandhound=#
Creating an Index View
For this step of the project, all I'll be doing is getting started on the home page. I've already set up my app (waypoints) within my project (lost and hound), but I won't be doing anything with it yet. Since my index view doesn't neatly correspond with what the waypoints application will be used for, I'd rather put it in the root of the project. This could be done by creating a views.py file at the same level as my settings.py in the lost_and_hound project folder:
├── lost_and_hound
│   ├── lost_and_hound
│   │   ├── __init__.py
│   │   ├── settings.py
│   │   ├── static
│   │   │   └── css
│   │   │       └── style.css
│   │   ├── templates
│   │   │   ├── base.html
│   │   │   └── index.html
│   │   ├── urls.py
│   │   ├── wsgi.py
│   ├── manage.py
│   └── waypoints
│       ├── __init__.py
│       ├── admin.py
│       ├── migrations
│       │   ├── __init__.py
│       ├── models.py
│       ├── tests.py
│       └── views.py
└── requirements.txt
but, since for now all of the dynamic content will be handled in my template, I'll use Django's TemplateView directly, a Generic Class Based View which basically just renders a given template when a specific view is requested, and spares me from having to actually write any new views.
In urls.py, import TemplateView from django.views.generic, and add the following to your urlpatterns:
from django.conf.urls import include, url
from django.contrib import admin
from django.views.generic import TemplateView

urlpatterns = [
    url(r'^$', TemplateView.as_view(template_name='index.html'),
        name='index'),
    url(r'^admin/', include(admin.site.urls)),
]
The as_view() classmethod is what makes the TemplateView callable, so when the index page is requested, it will be matched to the index view, which is really just a callable version of TemplateView that renders my template upon request.
Now to the mapping...
Initializing a map with Django-Leaflet and Mapbox
I'm using Django-Leaflet to embed Leaflet in this project, mostly because it sounds nice to be able to control my map's settings in my Django settings. So far, I haven't actually elected to do this, but I'll get into that later.
After installing, adding 'leaflet' to your list of installed apps in settings.py, and creating a simple base template:
<!DOCTYPE html>
{% load staticfiles %}
<html>
<head>
<link href="{% static 'css/style.css' %}" rel="stylesheet" type="text/css">
<title>Lost and Hound</title>
{% block head %}
{% endblock %}
</head>
<body>
{% block content %}
{% endblock %}
<footer>
<p>© 2015 Grace Hatamyar</p>
</footer>
{% block script %}
{% endblock %}
</body>
</html>
We're ready to put together an index template, which is where our map will be initialized. This will extend our base template, then add the leaflet library with Django-Leaflet tags:
{% extends 'base.html' %}
{% load leaflet_tags %}

{%  block head %}
    {% leaflet_js %}
    {% leaflet_css %}
{%  endblock %}
In the content block, I can initialize my map using the leaflet_map tag, and providing a name:
{% block content %}
    {% leaflet_map "map" callback="mapInit" %}
{% endblock %}
This also sets a callback function 'mapInit', which I'll use to customize how my map looks and what it does when initialized. That function will be written in the script block of my template:
{% block script %}
    <script type="text/javascript">

        function mapInit(map, options) {

            L.tileLayer('https://api.tiles.mapbox.com/v4/mapbox.streets/{z}/{x}/{y}.png?access_token={{ mapbox_key }}', {
                attribution: '<a href="http://creativecommons.org/licenses/by-sa/2.0/">CC-BY-SA</a>, Imagery © <a href="http://mapbox.com">Mapbox</a>',
            }).addTo(map);

            map.setView([47.61264, -122.32109], 11);

        };

    </script>
{% endblock %}
Since Django-leaflet has already initialized the map for us, all I'm doing is adding a tile layer to my map (aptly called 'map' here), by passing in the url for the tiles I want to use - in this case, mapbox.streets. Note that you'll need to provide a mapbox access key in this url. You could hard code this after 'access_token=' in the url string, or as I've done, use a template variable to get this in the right place. I've stored this variable in settings.py:
# Mapbox API Key
MAPBOX_KEY = os.environ.get('LH_MAPBOX_KEY')
which grabs the variable string from my .bash_profile using the os module.
I can then use this variable in urls.py by importing it from settings, and adding it as an extra keyword argument to the url() function for the index view:
from settings import MAPBOX_KEY

urlpatterns = [
    url(r'^$', TemplateView.as_view(template_name='index.html'),
        {'mapbox_key': MAPBOX_KEY},
        name='index'),
    url(r'^admin/', include(admin.site.urls)),
]
I could have also done this by utilizing the LEAFLET_CONFIG capability of Django-Leaflet in my settings.py, and including the key in an options dict:
LEAFLET_CONFIG = {
    'TILES': [(name, url, options)]
}
but I prefer to keep this rather long url in my html template.
This line:
map.setView([47.61264, -122.32109], 11);
just sets my map to open on arbitrarily chosen coordinates in Seattle, and the level of zoom I'd like to see.
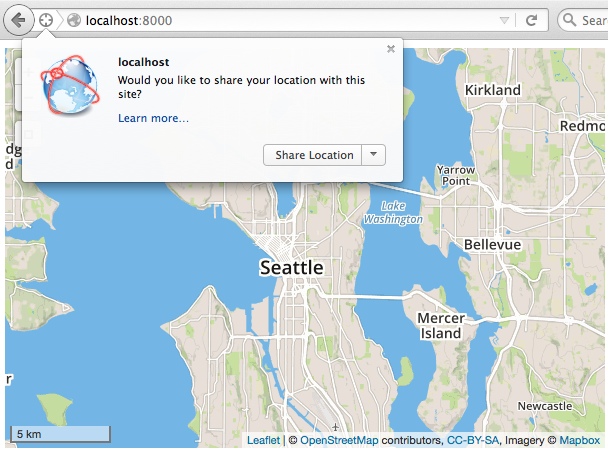
Using Geolocation with Leaflet
In our mapInit function above, we can now use the Leaflet API normally. This is great, because implementing geolocation with Leaflet couldn't be easier. Just add a call to the locate method:
map.locate({setView: true, maxZoom: 15});
which sets the view to the user's location once they agree to share, as well as the maximum zoom level.
My entire mapInit function now looks like so:
{% block script %}
    <script type="text/javascript">

        function mapInit(map, options) {

            L.tileLayer('https://api.tiles.mapbox.com/v4/mapbox.streets/{z}/{x}/{y}.png?access_token={{ mapbox_key }}', {
                attribution: '<a href="http://creativecommons.org/licenses/by-sa/2.0/">CC-BY-SA</a>, Imagery © <a href="http://mapbox.com">Mapbox</a>',
            }).addTo(map);

            map.setView([47.61264, -122.32109], 11);

            map.locate({setView: true, maxZoom: 15});
        };

    </script>
{% endblock %}
And, after starting the development server, and navigating to the index, the map shows up :)